Sunday, November 14, 2010

Bagels

Find me a person a who does not love bagels.  You can't (unless they have a gluten or wheat allergy.)  It's like trying to beat Prince and the Revolution in a game of basketball.  There are great bagel shops in NYC, but there is nothing like a homemade bagel to start the day...or for lunch...or dinner...

Bagel dough is drier than most bread doughs, with upwards of 6 or 7 cups of flour used.  This creates the dense, chewy texture hallmarking great bagels.  Some recipes call for a very high yeast content, which result in light, airy bagels more akin to those found in the bread section of the local grocery.  However, I feel pretty strongly that a proper bagel needs to be dense and substantial.
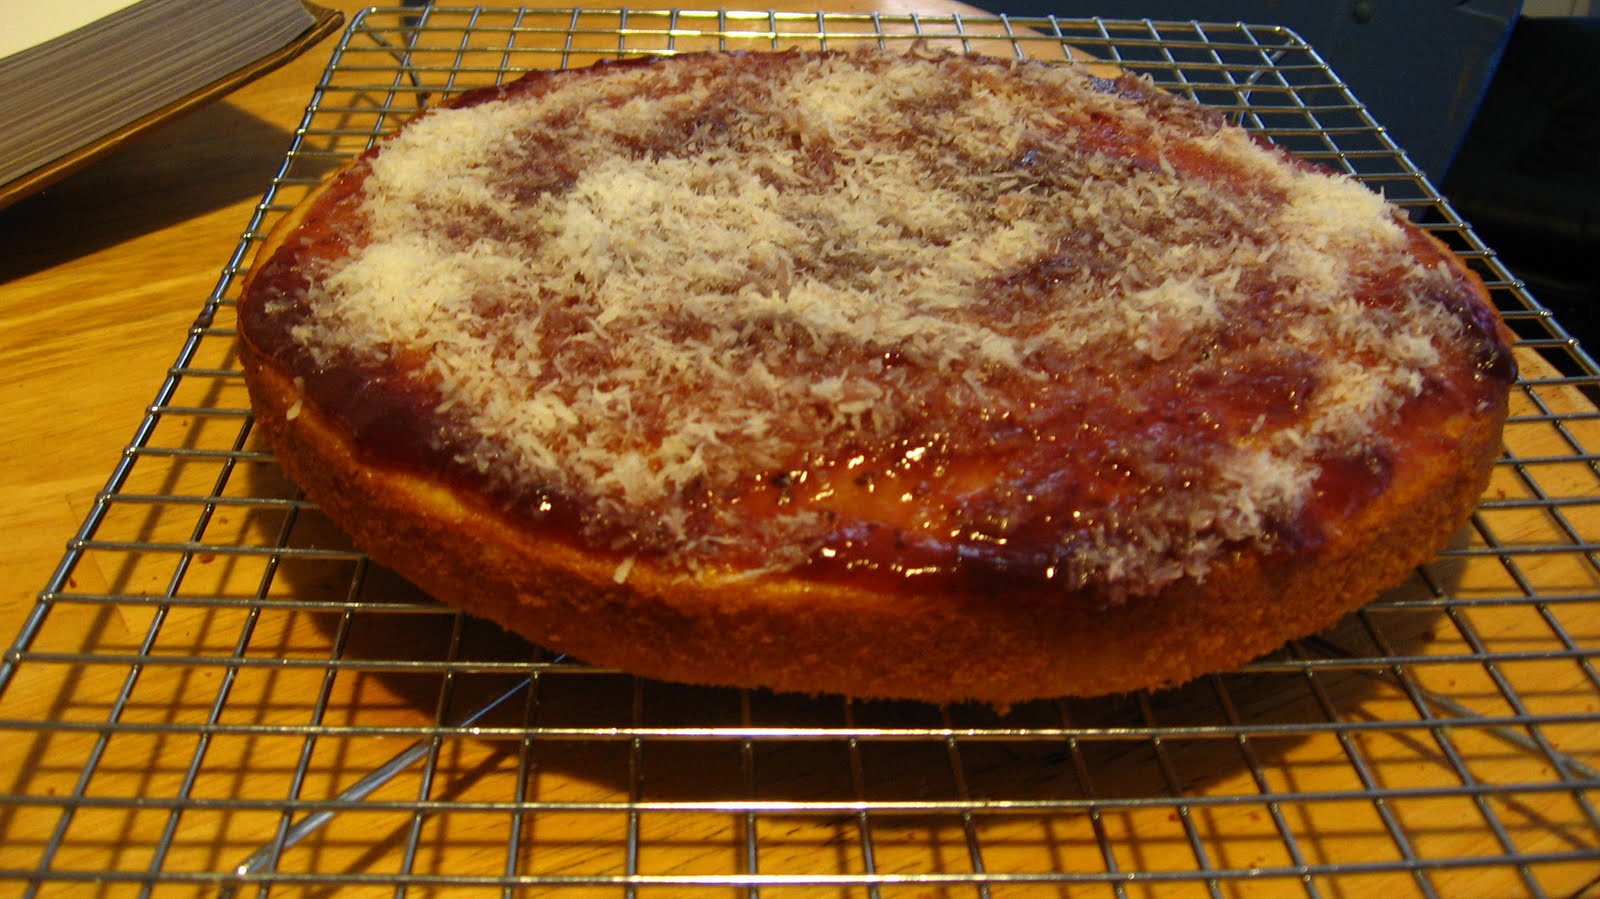
Plain bagels. Not perfectly pretty, but delicious.

The water used for poaching the bagels before baking should be sweetened.  You can experiment with various sweeteners for different tastes, but basic sugar, malt, and molasses are the mainstays as they provide excellent flavoring and don't wind up costing so much as honey (the poaching water should have more sweetener added every few bagels, so this can wind up taking a large chunk out of the honey reserves.)

Basic Bagels


6-7 cups all-purpose flour
1 Tbsp salt
1 packet active rapid-rise yeast
2 Tbsp honey
1 Tbsp butter (very soft or melted and cooled) (substitute vegetable oil if desired)
2 1/3 cup warm water


extra oil for greasing a large bowl
4+ Tbsp  sugar or malt for poaching

Mix the flour, salt and yeast in a large bowl.  Make a well in the dry ingredients and add the water, butter/oil, and sugar.  Mix to a dough, stirring in one direction to develop the gluten.  Add water a tablespoon at a time so that the flour is completely incorporated.

Once the dough is mixed, turn it out onto a lightly floured work surface and begin kneading.  Kneading bagel dough takes time, at least a solid 10 minutes of steady work.  The dough should be dry enough that you do not need to add more flour to keep it from sticking to the surface, so add flour as needed to make a nice dry dough.  It should be very hard to work with by the time it is ready to rise.  Form a ball with the dough and put it in a lightly oiled bowl, turning the ball so that it is evenly oiled all over.

Cover the bowl and place in warm area.  Let the dough rise until doubled in size, about 90 minutes.  Punch the dough down and knead vigorously for a minute or two.  A finger indentation in the dough should not spring back immediately.

Divide the dough evenly into 14 or 15 pieces.  There are a couple ways to form the bagels: form the dough into a ball and poke a finger through it to make the hole; or form the dough into a rope, bring the ends together, and pinch.  I prefer the ball method personally, as I find that when I make pinched ropes, they tend to come undone in the poaching.

After you have formed all the bagels, give the bottoms a quick brushing of oil or place them on a well greased tray.  Let them sit, covered, for 10-20 minutes.  While the bagels are sitting, bring a pot of water to a boil and preheat the oven to 500 degrees (you'll have about 10 minutes work ahead of you before we get to the baking, so if your oven heats quickly, save the preheating until later.)

Add 2 Tbsp sugar/malt/molasses to the boiling water.  Begin poaching the bagels, 2-3 at a time, for 60-90 seconds, turning once.  The bagels will expand while being poached, so leave room in your pot to accommodate.  Take the poached bagels and place them back on a sheet of parchment paper or the greased tray.

I prefer to use a baking stone with a coating of corn meal to bake, but cookie sheets are just as effective.  Bake the bagels for 12-15 minutes, until golden-brown on top.  Transfer to a cooling rack.  Enjoy.

Bonk appétit

Thursday, October 28, 2010

Challah time!

Sweet, buttery, wonderful challah.  There's not really a lot to say.  

Bonk appétite

3 1/2 cups flour (plus extra for if needed)
2/3 cup warm water (plus extra if needed)2 whole eggs + 1 yolk
1/4 cup butter, melted
1 tsp sugar
1/4 cup honey
1 tsp salt
1 packet active yeast
1/2 tsp baking powder
1-2 Tbs vegetable oil (for coating the bowl)

Mix the flour, salt, and baking soda together in a large bowl and make a well.  Pour 1/2 cup of the warm water into the well, add yeast and sugar.  Mix thoroughly and try to incorporate as little flour as possible.  Let sit for 5-10 minutes, or until foamy.

In a small bowl whisk together the two whole eggs, butter, and honey.  When the yeast has activated, add the egg mixture to the yeast mixture in the large bowl along with the rest of the water.  Stir thoroughly and incorporate all the flour.  Add extra flour or water as necessary to get a dough that is slightly moist, but that does not stick to your hands or table top.  Knead the dough for 5-10 minutes or until indentations in the dough take several seconds to spring back.  I found that challah dough takes very little kneading, this batch only took about 5 minutes, whereas most of my other bread doughs take a good 10 minutes of kneading.  Turn the kneaded dough into a well oiled bowl, cover, and let rise in a warm place.

I have a very idiosyncratic way of handling the rising process with challah.  My friend Laurel and I made challah often the summer after I graduated from college and this rising technique was recommended by her.  Let the dough rise 3 times: first, for 30-45 minutes (a little under doubled in size) then punch down and re-knead briefly; second, again for 30-45 minutes, punch down and re-knead briefly; third, for 90+ minutes (until more than doubled in size).

After the dough has risen for a third time, turn out onto your work space, divide the dough into thirds and form the thirds into rounds.  Now is a good time to preheat the oven to 375.  Roll or press out the rounds so that they are relatively flat, then roll the flats into cylinders.  Stretch and roll the cylinders into ropes 10-12 inches long.  Let these sit for a few minutes while the oven finishes preheating.  

In a small bowl, whisk the egg yolk and some warm water together to make the wash.

Braid the ropes together.  I've read that it is best to start from the middle, working out and that 5 twists is plenty, but as you can see from the picture, my braiding advice should be taken with a very large grain of salt. Once you have the loaf formed, brush the egg wash evenly onto the loaf, making sure to cover all the twists and corners.  

Bake for 30-35 minutes or until golden brown on top.  You can try reapplying the wash to the loaf in the first 10-12 minutes of baking as the dough rises, though you might need to increase bake time depending on how quickly your oven recovers to 375.  If you are using a baking stone, make sure to use plenty of corn meal as the wash may make the loaf stick.  If you are using a baking sheet, grease it very well.


Sunday, October 24, 2010

Pizza Dough

I love pizza as much as anyone.  Maybe more.  So it only made sense to try my hand at making pizza.  I'm happy to say that it has been a successful venture marked by me berating myself for eating too much pizza in one sitting.  The dough recipe is pretty standard and can be modified by adding a 1/4-1/2 cup wine or beer, 1-2 Tbs herbs (oregano or whatever else you have lying about that is savory), or changing the flour content to include some whole wheat (though I have found that this makes for a more difficult time in stretching the dough.)

I have no doubt that my baking technique will leave practiced pizza makers aghast, but hey, I'm working without a peel and have a finicky oven.  Also, I can't seem to find the pictures documenting this venture except for one post-baked and sliced.  Will add more the next time pizza is made.

Bonk appétit!

Basic Pizza Dough

3 cups flour (a finer ground flour will give you a stretchier dough, but all-purpose works just fine.)  If you are adding wine or beer, add 1/2 cup flour per 1/4 cup liquid.
1 cup warm water
1 packet dry active yeast
1 tsp sugar/honey
1 tsp salt
2 Tbs olive oil
1/4-1/2 cup wine or beer (optional) (Again, if you are adding extra liquid to the recipe, you will need to add more flour.)

Makes 3 12 inch crusts.

Add the yeast to the warm water, mix in the sugar and 1Tbs oil and let sit for 5 minutes.  Pour the liquid (and any beer or wine you are using) into a large bowl along with half the flour.  Since I don't mix or knead with a food processor, I usually make a basic sponge and let it sit for about 10-20 minutes before working in the rest of the flour.  To do this, once you have your liquids incorporated into half the flour, stir the mixture vigorously in one direction for about 1-2 minutes.  This will develop the gluten and give the crust some springiness that I find makes it easier to work with when forming the crusts.  Alternatively, you can simply add all the liquid to all the flour and mix throughly to form the dough.  If using the sponge method, add a little bit of flour at a time after the sponge has had time to sit and incorporate to form the dough.

Aim for a dough that is slightly moist.  If your dough is crumbly, add water.  If it is sticky, add flour.  When adding extra flour or water, do so 1 Tbs at a time.

Knead the dough for 10 minutes or until it has lost a bit of its springiness.  I usually test by pushing two fingers into the dough and seeing how quickly it springs back.  I prefer my pizza dough to have more plasticity than bread dough, but not so much that it will be frustrating to form the crusts.  Form the dough into a ball.  Once you are done kneading, coat a large bowl with the remaining oil and turn the dough in the bowl, covering it evenly with oil.  Cover the bowl and let the dough rise in a warm place for 1-2 hours.

You can punch down the dough and let it have a second rise, or form the crusts after a single rise.  Form the dough into a cylinder and cut into 3 equal pieces (if you added extra liquid and flour, you may find that the recipe is better suited to making 4 10inch crusts.)  Cover the pieces and let sit for about 10 minutes.  This short rise usually makes the dough easier to work with.  Pre-heat the oven to 500 degrees.

Roll, pull, or toss the dough to shape.  work on a lightly floured surface so that you may easily transfer the dough to a peel or sheet and then into the oven.  Aim for a crust that is about 1/8 thick.  Even thickness is the goal.  Lightly oil the formed crust, transfer it to a peel or sheet, top and toss it in the oven for 12-15 minutes.

Notes on baking


A hotter oven gives you a nice, crisp crust, but you may find that the pizza is a bit squishy in the middle depending on what your toppings are.  Since I don't have a pizza peel, I've found that transferring a fully topped pizza to the oven results in me cursing a lot and winding up with burns.  So, I sometimes will bake the crust on its own for 5-7 minutes at a lower temperature (450), take it out of the oven, top and then bake at 500 for 5-7 minutes.  I'll report back on how things work when I get my peel.

White/Flax loaf


Bread bread bread

Recently, I've been basking in the joys and smells of bread baking at home.  I'm still learning the ins and outs of amateur bread making, but so far all of the loaves have been tasty (though not always pretty.)  I think a lot of this has to do with my unpredictable Brooklyn apartment oven: runs hotter or colder depending on the alignment of the planets, not incredibly well insulated so heat recovery time is a little weak, etc. etc.

So what I thought I'd do is write a little about my kneading and raising techniques, post a basic recipe or two that I use and then give the rest over to pictures add pictures in later posts.  Comments, critiques, tricks are all welcome.

Starting and Kneading

When I start a loaf, I've been doing one of too things: I either add the activated yeast and water to 1 cup of flour and stir it vigorously for about a minute to develop the gluten, let this sponge rise for about 30 mins, and then add the rest of the flour and knead.  The other way I start a loaf is simply adding the yeast and water to the flour, give it a thorough mixing and a quick knead, let it rise for a few minutes and then get on with the kneading.  

These are both techniques I have read about, though I really have no idea how they affect the final product.  Thoughts?

As far as kneading goes, I'm a fan of working with a moist dough and adding flour throughout the kneading until I have a dough ball that is still slightly moist, but doesn't stick to the work surface or my hands.  I knead for about 10 minutes or until I can push a couple of fingers into the dough and it not spring back immediately.  

Kneading goes thus: flatten the dough with my left hand, stretch the dough with my right (just stretching, no tearing), pull back the dough, quarter turn, repeat.  When the ball has the right amount of springiness, I form a sphere with the dough and work it into a quasi-round shape (great description, I know.)  Basically, I pull the dough with my thumbs and work the dough to the bottom of the ball and knead it back into the center.

Then I let it sit for a couple of hours, covered in a lightly oiled bowl, until the dough has doubled.  Punch the dough down and knead again for a few minutes.  I turn it back into the bowl and let it rise a second time.  

Baking

A few weeks ago I decided that it was time to invest in a baking stone.  I don't regret it.  Worth every penny.  

When I bake bread, it is usually a basic loaf and I start it at 450 degrees and may or may not lower the temperature depending on how the loaf looks after 10 minutes.  

I've tried a couple of different baking techniques to get different crusts.  Our oven is not huge and we don't have a large steaming pot, so I haven't yet tried a simulated steam bake.  But I have put a pan of water in the back of the oven to increase the overall humidity.  I also tried spraying the loaf with water every couple of minutes for the first 20 minutes.  As I understand it, a more humid oven simulates a wood burning oven and gives you a crustier loaf.  Again, thoughts, suggestions, tips are always welcome.

Dough Cutting

I've read a lot about cutting the top of a loaf before baking to give the bread room to expand.  This certainly seems to work, though I always wind up with weird alien head loaves rather than a nice round.  Any tips?

Recipes

Basic White
3.5 cups all purpose or baking flour, plus extra for kneading
1 Tbs butter, softened
1.33 cups warm water
1 packet active yeast
1 tsp sugar
1 tsp salt

Basic White with flax
Same as above, but substitute .5 cup flax meal for .5 cup flour.

Basic Whole Wheat
Same as above, but substituting some whole wheat flour for the all-purpose.  The more whole wheat that is used, the denser the loaf will be and possibly will require longer baking times.

Thursday, September 16, 2010

Cake time

Patient Girlfriend's birthday was yesterday, and what is a birthday without cake?  One of our favorite bakeries in Brooklyn made a cake months and months ago that Patient Girlfriend has been talking about ever since: moist yellow cake, vanilla butter cream frosting, raspberry filling, topped with coconut.  One of the things I love most about One Girl Cookies is that their cake stands on its own.  It is not just a vehicle for the frosting as is the case with so many cakes.

Mine turned out a fair shade less attractive than a One Girl Cake largely in part due to the thin consistency of my frosting.  Other than that, I, and Patient Girlfriend, were very very happy with the cake.


Sponge Cake


1 cup very soft butter (2 sticks)
1 1/3 cup self-rising flour
2 Tbsp corn starch
1 tsp vanilla extract
4 large eggs
3/4 cup sugar
3 Tbsp milk


2 8 inch round cake pans, at least 2 inches deep


Pre-heat the oven to 350.  In a large bowl, cream the butter and sugar.  Add the vanilla.  Add one egg at a time, with a bit of flour between each egg.  Add the rest of the flour and cornstarch and incorporate well.  Add a bit of  the milk slowly until the batter is very slightly runny (not easy to pour, but drops nicely off a wood spoon.)

Line the cake pans with parchment paper and grease or butter the sides.  Pour equal portions of the batter into each pan.  Bake for 25 minutes or until the tops are gold and the edges have begun to pull away from the pan.

Remove from oven and let cool 10 minutes before turning out the cakes.  Let stand until cool.


Filling


Raspberry preserves (reduced sugar if possible)
Shredded coconut

The filling is simple: spread enough preserves on the top of each cake to thinly cover the entire cake.  Sprinkle with coconut.  Done.

Carefully stack the cakes, topped sides facing each other.

Buttercream frosting 
1/2 cup very soft butter (1 stick)
3 cups confectioner's sugar
1 tsp vanilla extract 
1/3 cup milk

Cream the butter in a large bowl.  Add and combine the sugar, vanilla, milk.  Beat until smooth and firm.

Now to be honest, cake decorating is not something I have practiced extensively (as is evident by the pictures.)  This frosting spread well along the top of the cake, but was too runny to cover the sides cleanly.  Any suggestions?

Toppings


1 small pomegranate, seeded
6 oz. fresh raspberries.

Cover the sides and top with pomegranate seeds, decorate the top with the raspberries.

 So it didn't turn out to be the prettiest thing I have ever made, though it is a lot prettier than some of the things that have come out of my kitchen.  The cake was delicious.  The frosting was sweet, but not sickeningly so, and most importantly, it did not overpower the flavor of the cake.  Hope you enjoy.

Bonk appétit!

Lime gelato...goes fut :(

I finally made a batch that was perfectly smooth, creamy and wonderful.  Too bad I ruined it with too much lime zest and not enough sugar...

On the plus side, I have an idea now of what I need to do to consistently make ice cream batches that come out with the consistency and texture I've been looking for.  Will update next week after some experimenting.

Thursday, September 9, 2010

Rosemary Honey Gelato

Wow.  This was fun.  And delicious.  I decided to try and make this batch of gelato without eggs in an attempt to get a denser ice cream without anything extra to play with the flavors.  This is a Sicilian-style gelato that uses cornstarch to thicken the base while cooking.

A couple of notes: this batch was extremely intense right out of the machine; the honey flavor was sharp and the rosemary left a strong bite.  After letting the batch set in the freezer overnight, it seems to have mellowed considerably, though it could be seasonal allergies wrecking havoc on my ability to taste or smell anything.  I used eucalyptus honey which is very sweet and syrupy.  Next time, I think a darker, smokier honey would be better, as the sweetness does seem to get in the way of the rosemary.  I think a darker honey would also be better if I ever get my hands on some lavender so I can make lavender infused gelato.

Second, since this base does not use any egg, I decided to use whole milk with the hope of avoiding weird water crystals during freezing and setting.  This seemed to work out well; the gelato feels a little gritty when scooping, and the appearance is not quite as smooth as I was hoping for, but the taste is wonderful and no real iciness creeps in when eating.

Also, I hate straining.  All the recipes I read for gelato call for straining out zest and herbs prior to freezing.  I am of the opinion that these will add flavor and character to the batch when it is served.  So long as it is edible and does not look particularly nasty or messes with the texture of the ice cream, it stays in.  If you prefer to keep such things out of your ice cream, strain the mixture after it cools prior to freezing.

Bonk appétit!
Special Equipment:
Ice cream machine

Ingredients:
2 cups whole milk
1 cup half and half (set aside 1/3 cup)
3 Tbsp corn starch
1/2 cup honey
1-2 Tbsp chopped rosemary


Makes about 1 quart

In a small bowl, mix the 1/3 cup half and half with the corn starch until the starch is dissolved and the slurry is smooth.  Set aside.

In a saucepan, heat the whole milk and remaining half and half, adding the rosemary after the liquid begins to heat through (2-3 minutes on medium heat.)  Add the slurry just before the mixture begins to boil.  Reduce the heat to low.  Add the honey.  Stir rapidly and thoroughly mix the honey, making sure it is completely dissolved.

Continue to cook and stir over low heat for several minutes, until the mixture begins to thicken.  Pay particular attention to scraping the bottom of the pan with a wood spoon or rubber spatula, as you want to avoid scorching.  Remove from heat before the mixture begins to boil and pour into a large bowl.  Set aside to cool or place the bowl in an ice bath.  While the mixture is cooling, a skin may form on the top.  Just whisk this back into the mixture.

Once the mixture is down to around room temperature, place the bowl in the refrigerator for several hours or overnight.  If you are able, give the mixture a little vigorous stirring every so often and taste check to see if the rosemary is strong enough for your liking.  If the rosemary is a touch weak, you can add more chopped herb to the mixture while it is cooling.

Again, I prefer to freeze the mixture for about an hour or two to make the machine process a little easier since the ice cream maker I use does not have a built in compressor.  If you find that your batches do not freeze well or remain very runny when in the machine, this may help out in getting a thicker batch.

I've found that when using a freezing core like the one here, if you can scrape the sides easily with a rubber spatula, you're in a good place as far as consistency is concerned.  Sometimes with this type of machine, the ice cream will freeze solid to the bottom and sides.  Generally, this means there is too much water in the mixture.  It is often a problem with sorbetto recipes, as they contain no milk fats.

One of the nice things about this recipe is that it makes for an excellent morning treat after a constant awakenings by cats.

Wednesday, September 8, 2010

Flaxseed Ravioli

This was my first time making pasta without a machine, also without enough eggs...  Fortunately, Patient Girlfriend reminded me that we had flaxseed in the fridge and that it makes an excellent egg substitute.  With that in mind, this is a basic pasta recipe with flaxseed replacing half of the egg requirements.  I actually wound up enjoying this as the flax gave the pasta a nice nutty flavor.  The filling I made was a simple, Greek inspired, onion and bell pepper mix that I cooked through, puréed, set to cool and then added yogurt and seasoning.


Time saving equipment (optional):
Food processor
Pasta machine

Ingredients (pasta):
1 1/2 cups all-purpose flour
1/2 tsp salt
1 Tbsp olive oil
1 egg, beaten
1 Tbsp flaxseed meal
3 Tbsp water

Mix the flaxseed and water in a small bowl and let sit for 2 minutes.  This substitutes for one egg.  The combination of 1 egg and 1 egg substitute seemed to work very well for the dough.

If using a food processor, sift the flour and salt into the processor and slowly add the oil and egg/substitute while the machine is running.  If the machine can mix the dough for upwards of a minute, the product should be a stiff smooth dough.  If the dough is too stiff for your machine, let it mix until smooth, then hand knead for 5 minutes.  You can hand mix the dough if a food processor is not available, the processor just saves a bit of time.

If using a pasta machine, roll out the dough in sheets according to the manufacturer's instructions.  If rolling by hand, divide the dough into two equal portions and roll out each on a floured surface until about 1/4 inch thick.  Fold the pasta into thirds and reroll.  Repeat 4-6 times, each time, rolling the dough a little thinner.  Keep the dough under a clean, dry dish towel while you prepare the filling.

Ingredients (filling):


1 small onion, finely chopped
1 small green bell pepper, finely chopped
1 Tbsp olive oil
1/4 cup water
1/4 cup plain Greek yogurt
salt, pepper, garlic powder, dill to taste (since the pasta dough is fairly nutty and flavorful, you can be fairly liberal with seasoning.)

Add the oil and water to a saucepan or wok and sweat the onion, adding the pepper after a couple of minutes.  Cook the vegetables through, seasoning to taste.  If you have access to a food processor, you can purée the mixture for a few seconds to make a finer filling.  Set the mixture aside and allow to cool, periodically draining off any excess moisture.  Once the filling is cool, add the yogurt and re-season if necessary.  Set aside while you finish the dough, again draining off excess moisture that accumulates.  


Preparation:


1/2 cup grated Parmesan cheese
1/2 cup oil oil


Lay out a pasta sheet and place a small portion of the filling in rows about two inches apart.  The firmer the mixture is at this point the better, and if it seems watery, just pour off the liquid prior to placing on the pasta sheet.  Brush a small amount of water between the filling portions and place another pasta sheet on top.  


Press down between each portion and then use a pasta cutter or sharp knife to cut the sheet into squares.  You can press the edges with a fork to help seal any uncooperative pieces.  Let the ravioli dry in the refrigerator then boil for about 5 minutes.


Sprinkle the cooked ravioli with the cheese and oil.  


Bonk appétit!

Tuesday, September 7, 2010

Double Chocolate Gelato (w/ peppermint patty pieces)

I haven't felt very inspired with my cooking lately, but this gelato wound up being quite nice.  No pictures this week since the combination of poor photography skills and brown ice cream really doesn't make for good viewing.

Before we start, a couple of things I have found about gelato making: fat is good - the higher fat content in the base, the more creamy the end product.  I tried making a couple batches of ice cream early on with low-fat and skim milks, but they came out more like an Italian ice with a pretty noticeable crystalline texture.  Low fat will result in faster melting time and may cause problems with thickening and consistency in the freezing process.

Most ice cream and even gelato recipes are custard based, that is, they incorporate egg yolk into the base to create a thicker, creamy mixture that is then frozen and aerated in an ice cream maker.  I was told that true gelato is not custard based which results in denser product when frozen.  Without an expert to consult on this point, I've simply been adding yogurt to the base as a thickening agent at the ratio of 2 tsp yogurt for each egg yolk called for.  The results have been quite nice.  Eventually, I'll try making a gelato without a thickener and will report back.

In this recipe, I used a combination of milk and dark chocolates in a 3:1 ratio.  It is certainly easy enough to change the types and amounts of chocolate to suit your tastes.  The end product in this recipe was not overly sweet, but very rich with the dark chocolate adding more of an undertone than real body to the ice cream.

Ingredients:
1 cup heavy cream
2 cups half and half (you can use whole milk if you like, but half and half works well enough and cuts down significantly on fat and saturated fat content.)
50g dark chocolate
150g milk chocolate
3/4 cup sugar
1 tsp vanilla extract.
2 Tbsp butter.
8 tsp plain yogurt or 4 egg yolks (I like plain yogurt because it takes the edge off the sweetness of the base, but feel free to use vanilla if you want.)
1/2 cup chopped peppermint patties (optional)

Yields about 3 pints.

Extra equipment:
ice cream machine
double boiler
candy thermometer

Melt the chocolate and butter in a double boiler until smooth, stirring constantly to avoid scorching.  Add the milks to the chocolate and blend over low heat.  Add sugar and increase the heat to medium/low and stir to dissolve the sugar.  Once the sugar is dissolved and the base is smooth, remove from heat and let cool slightly.  In a large separate bowl, whisk the vanilla extract and yogurt/eggs until well blended.  Slowly add the still warm base to the yogurt/eggs.  This is done to prevent the any curdling or scrambling that would occur if adding the yogurt/eggs directly to the very warm base.  Mix well.

Pour the mixture back into the sauce pan and stir over medium heat until the mixture is 170 degrees.  Little bubbles will begin forming around the edges and the mixture will thickly coat the back of a wooden spoon.  Remove from heat and allow to cool.  Refrigerate for several hours or over night.  Freeze in ice cream maker according to instructions, adding any the peppermint patty pieces after the ice cream begins to firm up.

Before freezing, I've found that sticking the mixture in the freeze for an hour or two helps in getting the ice cream to a nice thick density.  This is especially true if you are using an ice cream maker that does not have a built-in compressor.  Freeze in an air tight container for several hours before serving if you want it to be firmer.

As I said, this is may be closer to an American-style ice cream than a true Italian gelato given the use of a thickener and custard-style base, but in any event, it is delicious, rich, creamy, and a great cure for chocolate cravings.

Tuesday, August 31, 2010

The Good Cat

Due to some comments and a brick thrown at me on the street, I wish to apologize for referring to Eskimo as "the Other Cat."  From now on she will be "The Good Cat."  Macintosh will be tagged as "The Brown Cat."  Thank you for your feedback and refraining from physical violence.

Sunday, August 29, 2010

Rice and Bean Burrito Bowl with Yellow Onion and Simple Salsa

I've been craving Mexican food for awhile now.  Unfortunately, I don't know how to make a good mole poblano sauce, so I decided on working around a nice tangy salsa.  This dish can be vigorously seasoned and spiced to taste from fiery to mild.  If you don't go the vegetarian route, toss some grilled chicken or pulled pork into this.  I wanted to make tortillas and have burritos, but I was tired so we went with burrito bowls.

The Salsa
You can increase the amount of ingredients proportionally to meet your needs.  This recipe will make about enough for 4 servings.

1 Roma Tomato
2 medium Tomatillos (husked)
1 tsp Cumin
1 Tbsp Chili powder
2 Tbsp minced or grated Lemon Zest
Salt and Pepper to taste

Roughly chop the fruit and put in a food processor.  Add spices and pulse blend until finely chopped.

One of the things I love about this salsa is that it has a wonderful tangy flavor that compliments a spicier dish.  The lemon zest makes for a great undertone when the salsa is fresh, but becomes prominent after it sits for a day.  You can make variations on this salsa quite easily by adding seeded jalapeños for heat, increasing the tomato/tomatillo ration for sweetness, adding cilantro for bite, or pulling out the tomato for a pure salsa verde.       Add lime juice and substitute lime zest for a stronger citrus flavor.  Add chopped onions for body.  The version above is refreshing, simple, and delicious.

The Filling


This is really just a basic rice and bean dish that is topped with sweated onions and garlic.  You can play a lot with with seasonings, as with the salsa, but I tend to prefer a stronger flavor in the base that compliments the salsa.

1 large Yellow Onion
1-2 cloves Garlic
1 tsp Olive Oil
1/4 cup Water
1 cup Brown Rice (and water for cooking)
1 can Garbanzo or Black Beans (rinsed and drained)
Cumin, Chili Powder, Salt, and Pepper to taste
1 Tbsp Balsamic Vinegar
1 Tbsp Soy Sauce

Cook the rice (I use one of humanities' greatest inventions the Zojirushi Neurofuzzy, but cook as you normally would brown rice, leaving it a little on the dry side since we will be stir frying it later.)

Chop the onions and garlic roughly.  Put oil and water in a wok and heat.  Add onions and garlic.  Cook over medium/high heat until the water has cooked off.  While the vegetables are sweating, add chili powder, salt, pepper and cumin to taste.  Set aside.

Put the cooked rice and garbanzos in the wok.  Add the balsamic and soy sauce.  I really enjoy the combination of soy sauce and balsamic vinegar and use it as often as I can.  I love it because it makes a great savory base that you can build on easily.  Don't overdo the vinegar though, else it will overpower the other flavors.  Add cumin, chili powder, salt and pepper to taste.  Stir fry until the rice and beans are lightly browned.  You can easily add to the complexity of the dish by incorporating cilantro, citrus, bell pepper, tofu, meats, etc.  If adding tofu or meat, cook and season it separately then add it to the mix.

Serve the rice and beans in a bowl, top with onions and salsa.  Add grated cheese if you feel so inclined.

Sorry about the photo quality.  We had some lighting and camera issues
I have no doubt that I will revisit this dish with some fresh cilantro and when I've had some practice making mole sauce.  Until then...Bonk appétit!


The Other Cat

Macintosh's reluctant companion, the apple of Patient Girlfriend's eye, and completely indifferent to cooking: Eskimo.  She is our gray tabby and is more than willing to let us know when the cat bowl is running low on kibble.

Eskimo

Guest Recipe - Wheat Sesame Crackers

Patient Girlfriend recently made a batch of delicious baked crackers topped with sesame seeds.  They are wonderfully crispy and flavorful, and are excellent topped with a nice medium-sharp cheddar.  She found that the dough was a little salty before baking, and recommends that you either reduce the salt content of the dough or skip the salt topping if you prefer a less salty cracker.  

2/3 cup All-Purpose Flour
1/3 cup Whole Wheat Flour
1/2 tsp Baking Powder
1/2 tsp Salt
2 1/2 Tbsp Olive Oil
1/4 cup Water

Coarse Sea Salt to taste (a dash is more than enough)
Fresh Ground Pepper to taste 

Sesame Seeds to taste (a couple Tbsp should be fine)

Makes 3 dozen crackers.

Lightly grease a large baking sheet or line with parchment paper.  In a large bowl, whisk together the flours, salt, and baking powder.  Add the oil and blend thoroughly.  Slowly add the water and mix until the mixture forms a dough (it will be slightly crumbly when done.)  Roll the dough out on a floured surface until 1/8 inch thick.  If you have trouble getting the dough rolled out to 1/8 inch, it is fine to leave it thicker, but poke each cracker with a fork to prevent air bubbles from forming during baking.  Brush the dough sheet with a thin layer of olive oil.  Sprinkle with salt, sesame seeds, and pepper.  Cut the sheet into squares (the batch should make about 36 crackers) and place on the baking sheet.  Preheat the oven to 375 and bake the crackers for 10-15 minutes, or until the edges are golden.

Bonk appétit!

Wednesday, August 25, 2010

Summer Soup with Carrots, Red Pepper, and Orange.

Because Mac did his best to keep me up last night, I didn't really feel like making something complicated today.  I had the idea of making carrot soup and just went with it.  This soup is quick and has a nice, refreshing flavor that suits the end of summer weather we've been having in the City.  It is easily modified and can be made heartier with the addition of potatoes, rice, or tofu.  I've usually found that carrot-based soups are a little too sweet, but this one is tempered by the red pepper and curry powder.  The orange juice adds a nice undertone without overpowering the vegetables.

1lb Carrots, peeled and chopped
1 medium/large Yellow Onion, chopped (approx. 2 cups)
1 large Red Bell Pepper, chopped
1 Tbsp. Olive Oil
4 cups Vegetable Stock
1 cup Orange Juice
salt, pepper, and curry powder to taste (2 full tbsp curry powder gives a nice bite without adding too much heat)
Scallions

Large pot
Blender

Heat the oil in a large pot, add onion and let cook until tender.  Add carrots and peppers and let cook briefly.  Add stock and let simmer for 30 mins or until the vegetables are tender.  Transfer the solids to the blender and add enough liquid so that it easily purées.  It may be easier to do this batches.  Transfer the purée back to the large pot, blending with any leftover liquids.  Add the orange juice.  Add spices to taste.  Heat through (approx. 15-20 minutes.)  Garnish with scallions.  Serve with dipping bread.  


Bonk appétit

Tuesday, August 24, 2010

Potato and Banana Curry with Snowshoe Naan

This recipe is a variation on one my father gave me for chicken and shrimp curry.  Since Patient Girlfriend is a vegetarian and I am allergic to shellfish, I substituted white potato for the poultry and cut out the shrimp.  Thanks to Dad, for the original!

For the curry:
1 large potato (I used white, but will probably use a waxier variety next time), cubed
1 medium onion, finely chopped
1 bell pepper, roughly chopped
1 large banana, cubed
1 apple, cubed
1 clove garlic, crushed or finely minced
1 Tbsp tomato paste (I substituted 1 plum tomato finely diced and seasoned with a pinch of salt and sugar)
2 Tbsp curry powder (more to taste)
2 Tbsp butter
2 Tbsp olive oil
1 cup vegetable broth
1 tsp salt
pepper to taste

Melt the butter in a large skillet or wok.  Add the garlic and onion.  Cook briefly over medium/high heat then add the bell pepper.  Cook and stir vigorously for several minutes, until the onion begins to soften.  Add curry powder, banana, apple, and tomato paste (or diced tomato.)  Add broth slowly and blend.  Salt and pepper to taste.  Let simmer 10 minutes.

Curry set to simmer
In a separate pan, brown the potatoes in the olive oil.  In the future, I plan on adding baked tofu as a substitute for the shrimp.  I would probably prepare the tofu with a curry and herb rub before baking and then pan sear it.

Once the potatoes are browned, add them to the curry sauce and vegetables.  the curry can then be covered and left to cook through, or it may be transfered to a casserole dish and baked at 350 for 20-25 minutes.  I chose to bake to reduce the chance that the potatoes would be over cooked and fall apart.  When using a waxier potato and tofu, I would probably just let the curry cook through on the stove.

For the naan, I followed a recipe in Flatbreads and Flavors.  It is basically a yeast-based recipe that starts with a whole wheat sponge which is left to rise and then to which white flour is added.  After rising, the dough is divided, shaped and baked.

Naan before shaping and baking.
You can top the naan with any savory condiment.  I used thyme and garlic on these.  This was my first time baking naan, and I found the bake time to be almost twice what was stated in the cookbook.  I would also probably try brushing the breads with salt water or oil immediately prior to baking.

A finished naan.
I was pretty pleased with the naan.  It was filling, chewy without being under-done, and flavorful enough to complement the curry.

Mac was exceedingly well behaved over the course of preparation and decided only to get in the way when I was swapping baked and unbaked naan.
Mac helping
 
All in all, not a bad attempt.  I'm anxious to try this again with the different potato variety, tofu, and brushed naan.  Bonk appétit!
Curry and naan

The Cat

Mac with Teddy

This is Macintosh.  Our friend.  Our fearless feline who makes cooking that much more entertaining.  Though in repose here, Mac is usually under-foot in the kitchen.